
Today I would like to share with you how easy it is to get started using PowerApps and the Common Data Service. For this example, I created a “Lead Entry” PowerApp for use by Sales to quickly enter a new Lead from any supported device. The lead will be entered into my company’s Dynamics 365 online application and then moved to the Common Data Service using Microsoft Flow.
This article assumes that you have given your user record the required licenses in your Office 365 account (PowerApps & Flow) and that you have logged into the PowerApps admin area and set the appropriate privileges on the environment. Here are a couple of articles to help with those steps if you have not completed them.
This article will walk you through the creation of a Common Data Service database, a PowerApp and a Flow. Let’s get started.
The first thing you need to do is go to the PowerApps site and select the Sign-Up for free button in the upper right window. Be sure to sign-up with the same login that you use for your Dynamics 365 online application. This will ensure that PowerApps is associated with your organization.

Create a Common Data Service Database
Next, let’s create the Common Data Service database. Select Common Data Service from the left navigation menu, select Entities and select Get Started:

If you receive a privilege or access error review the CDS Overview link above and ensure you have provided the correct environment permissions to your user account or tenant. Another option is to select the Create a New Environment link and walk through the wizard.

In this example, I am using the default environment so, after selecting Common Data Service from the left navigation menu, I selected Entities from the drop down and selected the Create Database button.

I’m going to leave the default option of restricted for now as I can change it later when I am ready to make this more widely available.

As soon as I select the option to Create my Database, database creation begins. This normally takes no more than a minute or two. At this point, you need to wait for the process to complete.

That’s it, you’ve created a Common Data Service database. Once completed you’ll be presented with a few options, Browse Entities, Create an app, Try a sample app.

I am going to browse entities and confirm that a Lead entity exists. I scroll through the list of entities, locate the Lead entity, open it with a double-click and view the available fields. If I wanted to I could add some custom fields, import data or take other available actions.

Create a PowerApp
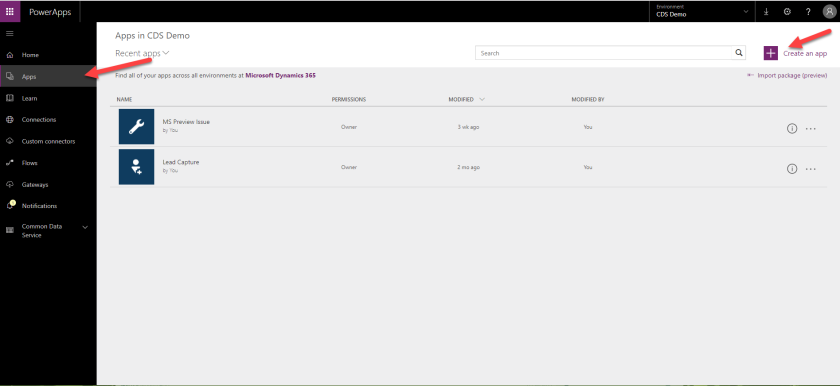
Since I’m happy with the available fields, I am ready to create the PowerApp for my sales team. Let’s get started by selecting Apps from the left navigation menu just under the Home button. Here you will see a list of available apps that you can use as well as a new App button. I’m going to select the Create an App button.
A new window will open and here I will select to create the PowerApp using the Dynamics 365 application data.

After making the selection, I need to choose my dataset. Keep in mind that I am already logged in so PowerApps automatically retrieves the list of instances associated with my credentials.

Next I am going to provide the additional connection information required for PowerApps to complete the connection. In this scenario, I choose the Leads table, and then select the Connect option.

PowerApps will begin building your App. This will take a minute or two. When completed, your new App will open in edit form and look something like this.

The left navigation area displays the screens that were created, in the center you have the App that you will be working with and on the right you will see various property elements related to the areas of the App.
Since I am going to make several changes, that could be challenging to follow, I decided to record those changes so you could watch rather than read. If you are trying this, you can follow along with the video.
A couple of things I changed after the recording:
- Changed the default mode for the screen from Edit to New. This will ensure that the app opens with blank fields for entering a new lead record.
- Removed the Customer field and replaced it with Company Name.
You can now select Ctrl S or File > Save As, in the upper left window to save your Lead Capture App. Once saved, you can navigate up to App Settings on the same menu where you can make changes like; Edit the App name, change the icon, background color, and add a description.

You can now test the app by selecting it from the list of Apps or returning to the edit screen and selecting the “Go” button, that looks like an arrowhead pointing to the right, from the right top menu between the question mark and the undo / redo buttons.
Create a Flow
The final piece of the solution is to create a Flow. Flow will move the Lead record from Dynamics 365 Customer Engagement to the Common Data Service database that was referenced in the first section of this article. Let’s get started.
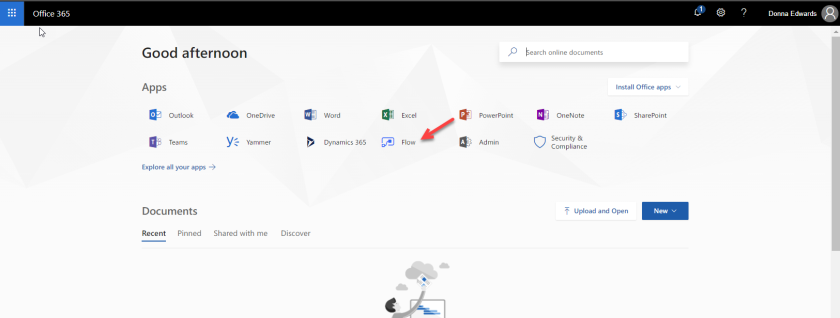
Select Flow from the Apps section of your Office 365 home page.
 Next, select the My Flows tab, the CDS environment created for use with this application, and the Create from Template option.

In the template search, type the value, dynamics 365 copy lead, and it will bring up the template that we can use to copy leads from Dynamics 365 Sales to CDS.

Since I am logged into the environment, Flow will automatically use my credentials to create the connections needed for the flow. If I wanted to create a different connection to either of the data stores, I can do that by selecting the ellipses button next to the desired connection. I’m happy with the connections listed so I’ll select the Continue button.

On the next screen we have the option to select the Dynamics 365 Organization we want to use and select ‘default’ for the CDS database.

After selecting the default value, you will have the option to add the desired field values to copy over to CDS. The application is very intuitive so it should be fairly easy for you to update the field values as desired.

The final step is to select the Create Flow option at the bottom of the page and we are done. You are now ready to test your solution.
This is a fairly simple example of how IT Pros can easily create an application for use by one department, the Sales team in this example, and make that data available to multiple applications for consumption using readily available tools and “no code” solutions.
I look forward to learning about the applications you create to enhance productivity, simplify processes, achieve goals, and provide creative solutions to your team’s challenges. Let me know what you’ve created in the comments area below.
Cheers

Perfect post
Thank you Disu
Thanks for this great description. First time I did something with PowerApp and much better then “Hello world”
Reblogged this on Nishant Rana's Weblog.